Vue3 笔记
适用人群:有 Vue2 基础,想快速掌握 Vue3 核心特性的开发者
参考资源:Vue3 官方文档
一、Vue3 简介
Vue (读音 /vjuː/,类似于 view) 是一款用于构建用户界面的 渐进式 JavaScript 框架。
相比 Vue2,Vue3 的核心优势:
| 特性 | 说明 |
|---|---|
| 性能提升 | 打包大小减少 41%,初次渲染快 55%,内存占用减少 54% |
| 源码升级 | 使用 TypeScript 重构,自带更好的类型推导 |
| Composition API | 拥抱组合式 API,让逻辑复用变得极其简单 |
二、创建 Vue3 工程
方式一:基于 vue-cli(已废弃)
基于 Webpack,目前已处于维护模式,不再推荐用于新项目。
方式二:基于 vite(推荐) ⭐⭐⭐
为什么推荐 Vite?
| 构建工具 | 启动原理 | 启动速度 |
|---|---|---|
| Webpack | 先抓取整个应用依赖并构建 | 较慢 |
| Vite | 利用浏览器原生 ES Modules,按需实时编译 | 秒开 |
三、Vue3 核心语法
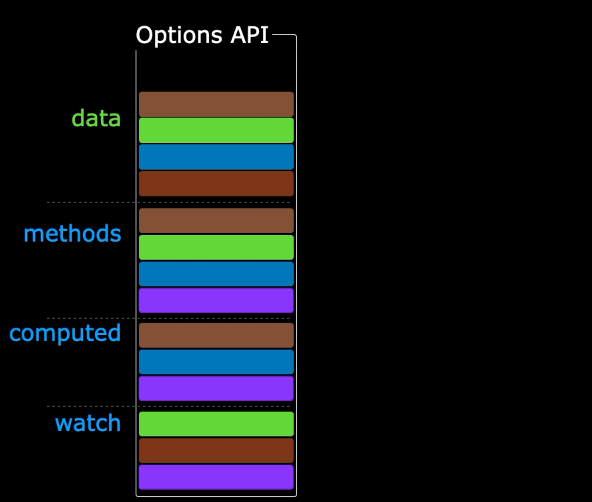
3.1 Options API vs Composition API
Options API 的弊端
数据、方法、计算属性分散在 data、methods、computed 中。新增或修改需求需要多处修改,不利于维护和复用。
Composition API 的优势
用函数的方式组织代码,让相关功能的代码有序地组织在一起。
3.2 setup 配置项 ⭐⭐⭐
setup 概述
setup 是 Vue3 新增的配置项,值是一个函数,是 Composition API 的舞台。组件中的数据、方法、计算属性、监视等均配置在 setup 中。
特点:
- setup 返回的对象内容可直接在模板中使用
- setup 中访问 this 是 undefined
- setup 在 beforeCreate 之前调用,领先所有钩子
setup 返回值
| 返回类型 | 说明 |
|---|---|
| 对象 | 属性、方法可直接在模板使用(重点关注) |
| 函数 | 自定义渲染内容 |
setup 与 Options API 的关系
- Vue2 配置(
data、methods...)可以访问 setup 中的属性、方法 - setup 中不能访问 Vue2 配置(
data、methods...) - 如果冲突,setup 优先
setup 语法糖 ⭐⭐⭐
<script setup lang="ts">
  console.log(this) // undefined

  // 数据(注意:此时不是响应式数据)
  let name = '张三'
  let age = 18

  // 方法
  function changeName() {
    name = '李四' // 页面不会变化,因为不是响应式
  }
</script>
配置组件名称:使用 defineOptions
3.3 响应式数据
ref ⭐⭐
ref 可创建基本类型和对象类型的响应式数据。
import { ref } from 'vue'

// 基本类型
let count = ref(0)

// 对象类型
interface Person {
  id: string
  name: string
  age: number
}
let person = ref<Person>({
  id: '1',
  name: '张三',
  age: 18
})
注意事项:
- ref 返回 RefImpl 对象,JS 操作需要 .value
- 若 ref 接收对象类型,内部实际调用了 reactive
reactive ⭐⭐
reactive 只能创建对象类型的响应式数据,返回 Proxy 实例。
ref vs reactive 对比
| 对比项 | ref | reactive |
|---|---|---|
| 适用类型 | 基本类型 + 对象类型 | 仅对象类型 |
| JS 操作 | 需要 .value |
直接访问 |
| 深层响应式 | 自动开启 | 自动开启 |
使用原则:
- 基本类型响应式数据 → 必须用
ref - 层级不深的对象 →
ref或reactive均可 - 层级较深的对象 → 推荐
reactive
toRefs 与 toRef
直接从响应式对象解构会丢失响应式,解决方法:
import { toRef, toRefs } from 'vue'

// 单个转换
let price = toRef(car, 'price')

// 批量转换
let { a, b } = toRefs(car)
3.4 computed 计算属性 ⭐⭐⭐
根据已有数据计算出新数据,本质是 ComputedRefImpl 响应式数据。
特点:只读,依赖变化时自动重新计算,未变化时使用缓存值。
<script setup lang="ts">
import { computed, ref } from 'vue'

let firstName = ref('zhang')
let lastName = ref('san')

// 只读写法
let fullName = computed(() => firstName.value + ' ' + lastName.value)

// 可读写法
let fullName2 = computed({
  get() {
    return firstName.value + ' ' + lastName.value
  },
  set(value) {
    const [first, last] = value.split(' ')
    firstName.value = first
    lastName.value = last
  }
})
</script>
3.5 watch 监听器 ⭐⭐⭐
watch 监听数据变化并执行回调,可监听以下四种数据:
ref定义的基本类型数据ref定义的对象类型数据reactive定义的对象类型数据- 函数返回的值(getter)
- 以上类型的数组(多源监听)
情况一:监听 ref 基本类型
import { ref, watch } from 'vue'

let count = ref(0)

// 直接写数据名,监听 value 值变化
watch(count, (newValue, oldValue) => {
  console.log(newValue, oldValue)
})
情况二:监听 ref 对象类型
直接写数据名监听的是地址值,想监听内部数据需开启深度监视。
let person = ref({ name: '张三', age: 18 })

// 监听地址值
watch(person, (newValue, oldValue) => {
  console.log(newValue, oldValue)
}, { deep: true })
情况三:监听 reactive 对象类型
默认开启深度监视。
let person = reactive({ name: '张三', age: 18 })

watch(person, (newValue, oldValue) => {
  console.log(newValue, oldValue)
})
情况四:监听对象中的特定属性
推荐写成函数形式:
// 监听基本类型属性
watch(() => person.name, (newValue, oldValue) => {
  console.log(newValue, oldValue)
})

// 监听对象类型属性
watch(() => person.car, (newValue, oldValue) => {
  console.log(newValue, oldValue)
}, { deep: true })
情况五:监听多个数据源
watch([() => person.name, () => person.car], (newValue, oldValue) => {
  console.log(newValue, oldValue)
}, { deep: true })
3.6 watchEffect ⭐⭐
官方定义:立即运行一个函数,同时响应式追踪其依赖,并在依赖更改时重新执行。
对比 watch:
- watch:需显式指定监听数据
- watchEffect:自动追踪依赖,用到什么数据就监听什么
import { watchEffect } from 'vue'

const stopWatch = watchEffect(() => {
  if (temp.value >= 50 || height.value >= 20) {
    console.log('联系服务器')
  }
  // 取消监视
  if (temp.value === 100) {
    stopWatch()
  }
})
3.7 标签的 ref 属性
用于获取 DOM 节点或组件实例。
| 使用场景 | 获取内容 |
|---|---|
| 普通 DOM 标签 | DOM 节点 |
| 组件标签 | 组件实例对象 |
<template>
  <h2 ref="title2">前端</h2>
  <button @click="showLog">打印内容</button>
</template>

<script setup lang="ts">
import { ref } from 'vue'

let title2 = ref()

function showLog() {
  console.log(title2.value) // DOM 节点
}
</script>
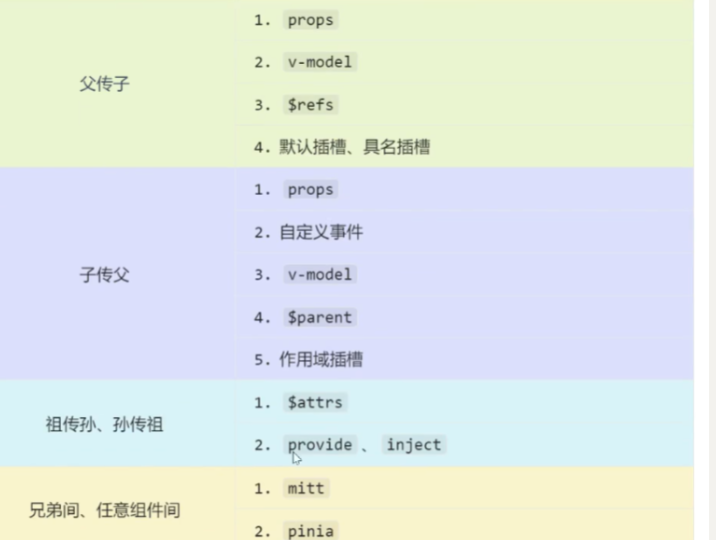
3.8 props 父传子
父组件通过属性传递数据,子组件通过声明接收。
基础用法
<script setup lang="ts">
// 数组写法
const props = defineProps(['list', 'title'])

// TypeScript 写法
interface Props {
  list: Person[]
  title?: string // 可选
}
defineProps<Props>()
</script>
带默认值
<script setup lang="ts">
interface Props {
  list?: Person[]
}

const props = withDefaults(defineProps<Props>(), {
  list: () => [{ id: '1', name: '张三', age: 18 }]
})
</script>
四、Vue3 生命周期 ⭐⭐⭐
在 Composition API 中,setup 在 beforeCreate 之前调用。
Vue2 vs Vue3 生命周期对比
| 阶段 | Vue2 | Vue3 (Composition API) | 说明 |
|---|---|---|---|
| 创建 | beforeCreate、created |
setup() |
移除这两个钩子,逻辑放 setup |
| 挂载 | beforeMount、mounted |
onBeforeMount、onMounted |
加 on 前缀 |
| 更新 | beforeUpdate、updated |
onBeforeUpdate、onUpdated |
加 on 前缀 |
| 卸载 | beforeDestroy、destroyed |
onBeforeUnmount、onUnmounted |
Destroy 改为 Unmount |
使用示例
<script setup lang="ts">
import { onBeforeMount, onMounted, onBeforeUnmount, onUnmounted } from 'vue'

onBeforeMount(() => console.log('onBeforeMount'))
onMounted(() => console.log('onMounted'))
onBeforeUnmount(() => console.log('onBeforeUnmount'))
onUnmounted(() => console.log('onUnmounted'))
</script>
五、Vue3 自定义 Hooks ⭐⭐⭐
自定义 hook 本质是一个函数,将 Composition API 提取封装,设计理念类似 Vue2 的 mixin。
规范的 Hook 结构:响应式数据 + 操作方法 + 生命周期钩子
// src/hooks/useMousePosition.ts
import { ref, onMounted, onUnmounted } from 'vue'

export function useMousePosition() {
  const x = ref(0)
  const y = ref(0)

  const update = (e: MouseEvent) => {
    x.value = e.pageX
    y.value = e.pageY
  }

  onMounted(() => window.addEventListener('mousemove', update))
  onUnmounted(() => window.removeEventListener('mousemove', update))

  return { x, y }
}
使用方式:
<script setup lang="ts">
import { useMousePosition } from '@/hooks/useMousePosition'

const { x, y } = useMousePosition()
</script>
六、Vue3 Router ⭐⭐⭐
6.1 Router 基础
| 特性 | Vue Router 3.x (Vue 2) | Vue Router 4.x (Vue 3) |
|---|---|---|
| 创建实例 | new VueRouter({}) |
createRouter({}) |
| 模式设置 | mode: 'history' |
history: createWebHistory() |
| 组件访问 | this.$router / this.$route |
useRouter() / useRoute() |
| 基础路径 | base 属性 |
createWebHistory('/base') |
6.2 初始化 Router
// src/router/index.ts
import { createRouter, createWebHistory } from 'vue-router'

const router = createRouter({
  history: createWebHistory(),
  routes: [
    { path: '/', component: () => import('@/views/Home.vue') }
  ]
})

export default router
6.3 在 setup 中使用 Router
<script setup lang="ts">
import { useRouter, useRoute } from 'vue-router'

const router = useRouter() // 路由器实例
const route = useRoute()   // 当前路由信息

console.log(route.params.id)
</script>
6.4 RouterLink 与 RouterView
Vue3 推荐使用大驼峰 <RouterLink> / <RouterView>:
custom 模式(自定义渲染):
<RouterLink to="/home" custom v-slot="{ navigate }">
  <button @click="navigate">回到首页</button>
</RouterLink>
6.5 嵌套路由
子路由 path 不加 /:
const routes = [
  {
    name: 'test1',
    path: '/test1',
    component: () => import('@/views/test1.vue'),
    children: [
      {
        name: 'test11',
        path: 'test11', // 不加 /
        component: () => import('@/views/test11.vue')
      }
    ]
  }
]
6.6 路由守卫 ⭐⭐⭐
路由守卫用于路由跳转前后拦截(登录检查、权限校验等)。
Vue3 淡化了 next(),直接返回 true 或不返回即放行。
全局前置守卫
// router/index.ts
router.beforeEach((to, from) => {
  const isAuthenticated = !!localStorage.getItem('token')

  if (to.meta.requiresAuth && !isAuthenticated) {
    return { name: 'Login' }
  }
  return true // 放行
})
独享守卫
const routes = [
  {
    path: '/admin',
    component: AdminPage,
    beforeEnter: (to, from) => {
      if (!isAdmin()) return '/404'
    }
  }
]
组件内守卫
<script setup lang="ts">
import { onBeforeRouteLeave, onBeforeRouteUpdate } from 'vue-router'

// 离开前确认
onBeforeRouteLeave((to, from) => {
  const answer = window.confirm('未保存,确定离开?')
  if (!answer) return false
})

// 路由参数变化时(组件复用)
onBeforeRouteUpdate((to, from) => {
  console.log('文章 ID 变了:', to.params.id)
})
</script>
6.7 路由传参
| 方式 | URL 样式 | 刷新是否丢失 | 获取方式 |
|---|---|---|---|
| Query | /test?id=1 |
不丢失 | route.query |
| Params | /test/:id |
不丢失(需占位) | route.params |
接收参数:
<script setup lang="ts">
import { useRoute } from 'vue-router'
const route = useRoute()
console.log(route.params.id)
</script>
props 配置:
{
  path: '/user/:id',
  component: User,
  // 方式一:将 params 作为 props
  props: true,
  // 方式二:函数写法(可处理 query)
  props: (route) => ({ id: route.params.id, name: route.query.name })
}
6.8 编程式路由
| 方法 | 行为 | 适用场景 |
|---|---|---|
router.push(loc) |
添加新记录 | 普通跳转 |
router.replace(loc) |
替换当前记录 | 登录页、重定向 |
router.go(n) |
跳转 n 步 | 返回上一页 go(-1) |
router.back() |
相当于 go(-1) |
后退按钮 |
router.forward() |
相当于 go(1) |
前进按钮 |
6.9 避坑指南
| 问题 | Vue Router 3 | Vue Router 4 |
|---|---|---|
| 404 匹配 | path: '*' |
path: '/:pathMatch(.*)*' |
| router-view 传值 | props: true |
使用插槽模式 |
| 守卫放行 | 必须调用 next() |
返回 true 或路由地址 |
<!-- router-view 插槽模式 -->
<RouterView v-slot="{ Component }">
  <transition name="fade">
    <component :is="Component" />
  </transition>
</RouterView>
七、Vue3 Pinia 状态管理 ⭐⭐⭐
Pinia 已取代 Vuex 成为 Vue3 官方推荐的状态管理工具。
7.1 标准目录结构
7.2 安装与初始化
// main.ts
import { createApp } from 'vue'
import { createPinia } from 'pinia'
import App from './App.vue'
import router from '@/router'

const app = createApp(App)
const pinia = createPinia()

app.use(router)
app.use(pinia)
app.mount('#app')
7.3 定义 Store
使用 defineStore,需要唯一 id,第二个参数可以是对象(选项式)或函数(组合式)。
选项式写法
// store/userStore.ts
import { defineStore } from 'pinia'

export const useUserStore = defineStore('userStore', {
  state: () => ({
    userName: 'liutianba7',
    password: '123456',
    age: 19
  }),

  getters: {
    bigAge: (state) => state.age * 10
  },

  actions: {
    incrementAge() {
      this.age += 1
    }
  }
})
组合式写法
export const useUserStore = defineStore('userStore', () => {
  const userName = ref('liutianba7')
  const password = ref('123456')
  const age = ref(19)

  const bigAge = computed(() => age.value * 10)

  function incrementAge() {
    age.value += 1
  }

  return { userName, password, age, bigAge, incrementAge }
})
7.4 使用 Store
7.5 修改数据的方式
const userStore = useUserStore()

// 方式一:直接修改
userStore.userName += '~'

// 方式二:批量修改 $patch(性能更优)
userStore.$patch((state) => {
  state.userName += '~'
  state.age += 1
})

// 方式三:通过 actions
userStore.incrementAge()

// 方式四:重置 $reset(仅选项式写法支持)
userStore.$reset()
7.6 storeToRefs ⭐⭐⭐
直接解构 store 会丢失响应式!
// ❌ 错误:失去响应式
const { userName, age } = userStore

// ✅ 正确:使用 storeToRefs
import { storeToRefs } from 'pinia'
const { userName, age } = storeToRefs(userStore)
规则:
- State 和 Getters → 必须用 storeToRefs
- Actions → 直接解构(函数不需要响应式)
7.7 $subscribe 监听状态变化
userStore.$subscribe((mutation, state) => {
  console.log('数据变了!', mutation.type)
  // 同步到本地存储
  localStorage.setItem('user_info', JSON.stringify(state))
})
八、Vue3 组件通信 ⭐⭐⭐
8.1 props(父传子)
父组件传递数据,子组件通过 defineProps 接收。
<script setup lang="ts">
interface Props {
  title: string
  count?: number
}
const props = defineProps<Props>()
</script>
技巧:父组件传递函数可实现子传父。
8.2 自定义事件(子传父)
子组件通过 defineEmits 定义事件并触发。
子组件:
<script setup lang="ts">
const emit = defineEmits(['update-count'])

function handleClick() {
  emit('update-count', 100)
}
</script>

<template>
  <button @click="handleClick">传值给父组件</button>
</template>
父组件:
<template>
  <Child @update-count="handleUpdate" />
</template>

<script setup lang="ts">
function handleUpdate(val: number) {
  console.log('收到:', val) // 100
}
</script>
8.3 mitt(全局事件总线)
Vue3 移除了 $on/$off,官方不再推荐全局事件总线,但可用 mitt 替代。
安装:
初始化:
订阅者(接收数据):
<script setup lang="ts">
import bus from '@/utils/bus'
import { onMounted, onUnmounted } from 'vue'

onMounted(() => {
  bus.on('send-msg', (data) => {
    console.log('收到:', data)
  })
})

onUnmounted(() => {
  bus.off('send-msg') // 必须解绑
})
</script>
发布者(发送数据):
<script setup lang="ts">
import bus from '@/utils/bus'

function trigger() {
  bus.emit('send-msg', { text: '问候', code: 200 })
}
</script>
8.4 v-model(双向绑定)
组件上使用 v-model,本质是 modelValue 属性 + update:modelValue 事件。
传统写法:
<!-- 父组件 -->
<MyInput v-model="username" />

<!-- 子组件 -->
<script setup lang="ts">
const props = defineProps(['modelValue'])
const emit = defineEmits(['update:modelValue'])
</script>

<template>
  <input
    :value="props.modelValue"
    @input="emit('update:modelValue', $event.target.value)"
  />
</template>
Vue 3.4+ 推荐写法:使用 defineModel
<script setup lang="ts">
const model = defineModel()

function change() {
  model.value = '新值'
}
</script>

<template>
  <input v-model="model" />
</template>
绑定多个 v-model:
<!-- 父组件 -->
<Child v-model:title="pageTitle" v-model:content="pageContent" />

<!-- 子组件 -->
<script setup lang="ts">
const title = defineModel('title')
const content = defineModel('content')
</script>
8.5 $attrs(透传属性)
$attrs 包含父组件传递但未被 props/emits 声明的属性和事件。
<template>
  <GrandChild v-bind="$attrs" />
</template>

<script setup lang="ts">
import { useAttrs } from 'vue'
const attrs = useAttrs()
console.log(attrs)
</script>
8.6 $refs 和 $parent
| 方式 | 方向 | 说明 |
|---|---|---|
$refs |
父 → 子 | 父组件获取子组件实例 |
$parent |
子 → 父 | 子组件获取父组件实例 |
关键:子组件需通过 defineExpose 暴露属性。
<!-- 子组件 -->
<script setup lang="ts">
function sayHi() { console.log('Hi') }
const secret = '隐私数据'

defineExpose({ sayHi, secret })
</script>
8.7 provide/inject(祖孙通信)
祖先通过 provide 提供数据,后代通过 inject 接收,无需中间人。
祖先组件:
<script setup lang="ts">
import { ref, provide } from 'vue'

const themeColor = ref('skyblue')
provide('theme', themeColor)

// 提供修改方法
function changeTheme(color: string) {
  themeColor.value = color
}
provide('updateTheme', changeTheme)
</script>
后代组件:
<script setup lang="ts">
import { inject } from 'vue'

const theme = inject('theme', 'gray') // 默认值 gray
const updateTheme = inject('updateTheme')
</script>

<template>
  <h1 :style="{ color: theme }">后代组件</h1>
  <button @click="updateTheme('pink')">换肤</button>
</template>
8.8 Pinia(任意组件通信)
通过 Pinia 状态管理,任意组件可共享数据。详见第七章。
九、Vue3 插槽
插槽:子组件预留位置,父组件决定显示内容。
9.1 默认插槽
子组件用 <slot> 占位,父组件传入内容替换。
<!-- 子组件 -->
<template>
  <div class="box">
    <h3>标题</h3>
    <slot>默认文字</slot>
  </div>
</template>

<!-- 父组件 -->
<Child>
  <p>自定义内容</p>
</Child>
9.2 具名插槽
多个插槽需"对号入座"。
<!-- 子组件 -->
<template>
  <header><slot name="header"></slot></header>
  <main><slot></slot></main>
  <footer><slot name="footer"></slot></footer>
</template>

<!-- 父组件 -->
<Child>
  <template #header><h1>头部</h1></template>
  <p>中间内容</p>
  <template #footer><p>底部</p></template>
</Child>
9.3 作用域插槽 ⭐⭐⭐
数据在子组件,但渲染方式由父组件决定。
子组件:把数据绑定到 slot。
<script setup lang="ts">
const games = ['王者荣耀', '英雄联盟', '黑神话:悟空']
</script>

<template>
  <ul>
    <li v-for="game in games" :key="game">
      <slot name="gameSlot" :game="game"></slot>
    </li>
  </ul>
</template>
父组件:通过 #名字="slotProps" 接收数据。
<List>
  <template #gameSlot="{ game }">
    <span style="color: red;">🔥 {{ game }}</span>
  </template>
</List>
十、Vue3 其他特性
10.1 Teleport(传送门) ⭐⭐
将组件渲染到指定 DOM 位置,不受父组件层级限制。
常见用途:模态框、通知、全局提示。
10.2 Suspense(异步组件加载) ⭐⭐
处理异步组件加载状态,提供加载中 UI。
<template>
  <Suspense>
    <!-- 异步组件 -->
    <template #default>
      <AsyncComponent />
    </template>
    <!-- 加载中显示 -->
    <template #fallback>
      <div>加载中...</div>
    </template>
  </Suspense>
</template>
10.3 Fragment(多根节点)
Vue3 组件可以有多个根节点,不再强制单一根元素。
10.4 异步组件
<script setup lang="ts">
import { defineAsyncComponent } from 'vue'

const AsyncComp = defineAsyncComponent(() =>
  import('@/components/HeavyComponent.vue')
)
</script>
10.5 shallowRef / shallowReactive
减少大型不可变结构的响应性开销,只对顶层响应式。
| API | 说明 |
|---|---|
shallowRef |
只有 .value 是响应式,内部对象非响应式 |
shallowReactive |
只有顶层属性响应式,深层属性非响应式 |
import { shallowRef, shallowReactive } from 'vue'

const state = shallowRef({ a: 1, b: { c: 2 } })
// state.value.a = 2 // 不触发更新(非响应式)
// state.value = { a: 2, b: { c: 2 } } // 触发更新

const obj = shallowReactive({ a: 1, b: { c: 2 } })
// obj.a = 2 // 触发更新
// obj.b.c = 3 // 不触发更新(深层非响应式)
十一、Vue3 学习路线
| 阶段 | 内容 | 重要程度 |
|---|---|---|
| 入门 | 创建工程、setup 语法糖 | ⭐⭐⭐ |
| 核心 | ref、reactive、computed、watch | ⭐⭐⭐ |
| 进阶 | 自定义 hooks、组件通信 | ⭐⭐⭐ |
| 生态 | Router、Pinia | ⭐⭐⭐ |
| 补充 | Teleport、Suspense、异步组件 | ⭐⭐ |